Free Nuxt SSR Configuration on GCP & AWS
Hosting an SSR website is expensive. It is possible to host your Nuxt SSR website for virtually nothing using a multi-cloud approach with GCP and AWS.

Server-side rendering (SSR) is known for being an approach in web development in which servers render out complete HTML websites. Clients get the full HTML instead of getting the different parts and rendering it themselves, making the initial load faster. Hosting an SSR website is well-known to be expensive since you need dedicated servers and scaling abilities for it. What if I told you it is possible to host your SSR website for virtually nothing?
You can host an SSR website (Nuxt app) for free using Google Cloud Platform (GCP) and Amazon Web Services (AWS). By leveraging GCP's serverless technologies (Cloud Run), you can deploy websites that automatically scale to match the demand with minimum maintenance and cost.
What is SSR?
Server-side rendering is an approach for web development. In it, servers render complete HTML websites, which get passed to the client side. You traditionally have servers running 24/7 because you don't know when someone might want to visit your site. Each link to an internal page goes to the server as a new request instead of faking that as a Single Page Application does. The server fully renders the page before sending it back to the client.
In contrast, the Static Site Generation and Single Page Application schemes give the client side all it needs to render the page (client side rendering). These approaches tend to have slower initial loads but faster subsequent loads in exchange for worse SEO and indexing.
Should I use SSR for my web application?
There's no correct answer for when to use SSR, Static Site Generation (SSG), or Single Page Application (SPA). It boils down to your needs, your budget, and development capabilities. You tend to use SSR in the following scenarios:
- You use third-party or sensitive services and don't want to expose keys.
- You have content-heavy websites, which you can render on the server to minimize loading times.
- You focus on SEO optimization and crawlers understanding your site.
- You are optimizing for slow or unreliable networks (such as mobile) and want to minimize the amount of resources loaded.
There are drawbacks, of course, with this approach. The main one is the cost of having servers and scaling capacity to handle traffic. Having multiple servers running 24/7 is not cheap. For example, Amplify Hosting (a serverless hosting solution from AWS) has comparable pricing to Cloud Run in some aspects but is still more expensive in others. We are trying to solve this with Nuxt SSR.
How do you configure Nuxt in SSR mode?
Nuxt is a versatile, open-source framework for web applications based on Vue.js. It offers different rendering modes that fit your application needs (SPA, SSG, SSR). This framework simplifies web application development by doing some of the heavy lifting for you. Nuxt 3 is the latest version, using Vue 3 and the Composition API.
Server Side Rendering is also called Universal Rendering in Nuxt 3. It is because it has a component of server-side processing but then JavaScript hydration in the client. In this case, we try to minimize the client side work that Universal Rendering brings.
Configuring Nuxt 3 to run in Server-Side Rendering mode is simple. I'll show you how to do it, starting from the point in my previous guide from working with Nuxt 3 (a blog starter using Nuxt Content). These are the configurations you need to manage to ensure that SSR is on:
- Ensure you have SSR enabled in the Nuxt config file.
- Replace any NuxtLink components from your Single File Component files for plain HTML links. It ensures that the Nuxt engine and Vue router won't run on the client side, forcing the site to use the full SSR capability.
That's it! That's all you change to ensure Nuxt runs in full SSR mode. If you follow these best practices, you can guarantee your production deployment will work correctly. Continue reading to understand how to verify this.
How can I ensure that Nuxt 3 is running in SSR mode?
It's ok if you are unsure if the configuration is correct. You can verify by running the following command:
npm run build && node .output/server/index.mjs
The command from above builds the site and runs the server script to serve the website locally:
- You should see your website if you visit http://localhost:3000 (the port might be different in your case).
- Open the developer tools in your browser (Chrome, Safari, Edge) and go to the Network section. Note that having Nuxt Devtools can help you troubleshoot issues faster on your SSR app.
- Click on internal links on your website, and you should see new requests to http://localhost:3000 that return the complete HTML.
You might need to troubleshoot your site if you don't see new requests when you click the internal links.
Caveats with running Nuxt 3 in SSR mode
There are a couple of caveats when working with Nuxt 3 in SSR mode. You should know these when working with this framework using this rendering mode.
API calls
If you need to run API calls or some logic on the server side only, you should change how you do it slightly. If you do it directly on the component setup, you might face double firing (once in the client and once in the server). You want to prevent this because some of your API calls might be private.
Creating server/api/[NAME].js files will solve this. The server engine uses those to ensure that the logic only runs on the server side. You can use useFetch to grab those results during rendering time in the server. Even if you are not using an external service, you can configure it to get sensitive values only on server side rendering.
export default defineEventHandler((event) => {
  return fetch(
    'http://metadata.google.internal/computeMetadata/v1/instance/id',
    {
      headers: {
        'Metadata-Flavor': 'Google',
      },
    }
  ).then((response) => {
    return response.text();
  });
});
You can verify this with console prints, which show you output only in the server. If you've done this correctly, it should also minimize the code in your Vue.js setup script. Afterward, in your Vue.js code, you will have to use useFetch to get the data like this:
<script setup>
  const { data: revision } = await useFetch('/api/revision')
</script>
Plain Old JavaScript Object (POJOs)
Working with custom objects without giving Nuxt a way to serialize and deserialize them will get you errors when navigating your site. You should ensure that you are using plain JavaScript objects or adding the correct serializers for them.
In my example, I want to get some environment variables and metadata from the hosting server to prove the rendering happens on the server instead of the client. I kept getting the POJO problem until I stopped using objects freely and was stricter with what I loaded.
Note that it might complicate conditional rendering when you intend to render different components for user experience.
Dockerizing the Nuxt SSR Website
Dockerizing the Nuxt server is a critical step in this solution. Cloud Run needs Docker images to work, so you create one for the server. To do this, we'll add a Dockerfile to the root of our site. You need to install Docker for this.
# Props to https://markus.oberlehner.net/blog/running-nuxt-3-in-a-docker-container/
ARG NODE_VERSION=18.14.2

FROM node:${NODE_VERSION}-slim as base

ARG PORT=3000

ENV NODE_ENV=production

WORKDIR /src

# Build
FROM base as build

COPY --link package.json package-lock.json ./
RUN npm install --production=false

COPY --link . .

RUN npm run build
RUN npm prune

# Run
FROM base

ENV PORT=$PORT

COPY --from=build /src/.output /src/.output
# Optional, only needed if you rely on unbundled dependencies
# COPY --from=build /src/node_modules /src/node_modules

CMD [ "node", ".output/server/index.mjs" ]
Essentially, the Dockerfile does the following:
- Define a Node runtime environment.
- Install all dependencies in the container.
- Copy the files into the container.
- Start the Node server.
To optimize the container image and the copy operations, we also include a Dockerignore file to avoid copying unnecessary data:
/.nuxt
/.output
/.github
/node_modules
/terraform

.gitignore
README.md
After you define your Docker image configuration files, you can interact with them in the following way.
docker build . -t ssrblog
docker run -d -p 3000:3000 ssrblog
The main disadvantage of this approach is that you rebuild the image each time you change the website. It's not a very long process, but regardless, you have to rebuild for redeployment.
How does the architecture work?
As I mentioned, the goal of this is to be able to have a fully working, auto-scalable Nuxt SSR site. You achieve this by combining AWS and GCP services (you could also do a full GCP deployment). AWS will cover the distribution and DNS, while GCP will cover the computing aspect. In the diagram below, you can see how both cloud providers work together.
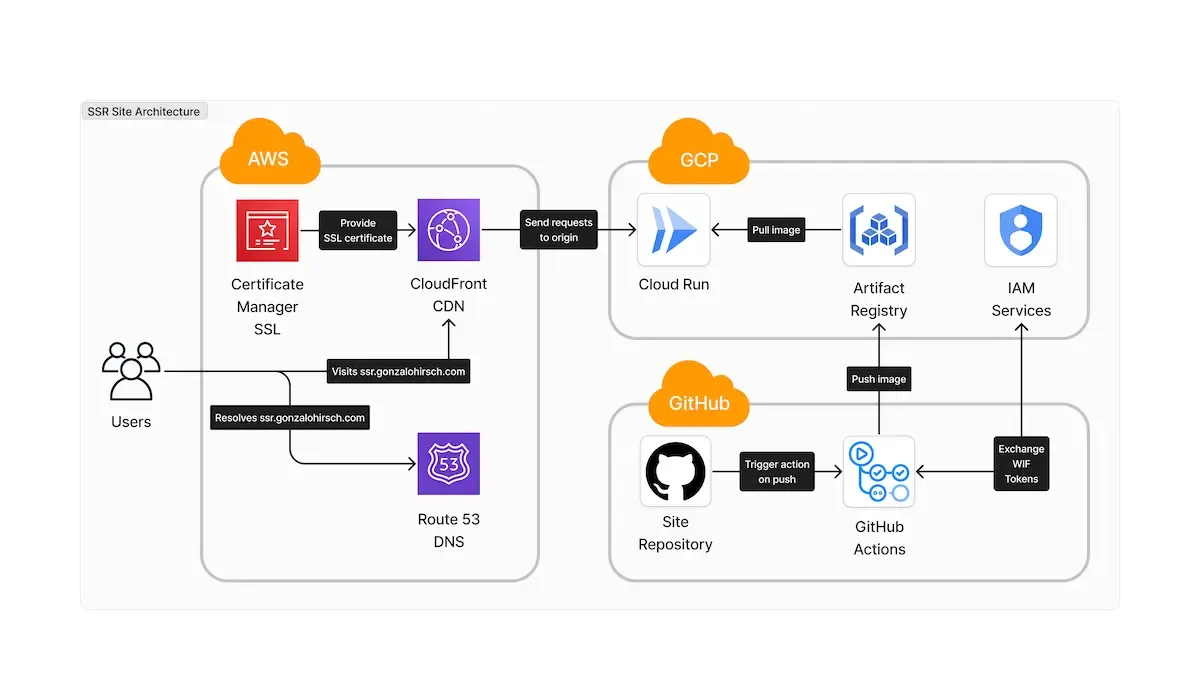
Cloud Run is the core component of this solution. It gets Docker images from the Artifact Registry and exposes the website. CloudFront, Route 53, and the Certificate Manager provide custom domains over it. This solution allows you to provide relevant caching and custom domains over Cloud Run for free, which can incur significant costs if done in Google Cloud.
Why should you use GCP's Cloud Run?
Cloud Run is a fully managed platform for serverless container computing. You provide Docker images to the platform, and it automatically provisions, scales, health checks, and auto-scales the servers. It is within the free tier in Google Cloud, which is great for personal projects. Cloud Run offers everything necessary to help you host projects virtually for free.
There is one considerable disadvantage to this approach. Cloud Run can scale to zero if the cluster doesn't have requests. After getting another request, the latency will be high for the first time. Because there is no active or idle instance to handle, the service spins up a new one, which might take several seconds. It is called a cold start.
How can you deploy it?
Since working with multi-cloud setups can be a handful, I recommend using Terraform to manage this more easily. You can find a terraform folder with all the relevant resources in the repository, and here you have instructions on how to work with it.
Note that each of the following subsections assumes that you run the commands within each of the terraform folders in the repository. I'll highlight some of the Terraform components, but I highly recommend you look at the entire stack. Try to execute everything in the order defined here to prevent errors.
Deploying the backend stack in Terraform
The backend stack (terraform/backend folder) handles creating a bucket in AWS where we can store the state files for the rest of the Terraform stacks. You can skip it if you intend to work locally and not share this with anyone.
The principal resource we create is an S3 bucket with the following configuration. The default configuration is enough for this use case, but feel free to configure anything else you need.
resource "aws_s3_bucket" "state" {
  bucket = "${replace(var.site, ".", "-")}--terraform-backend"
  tags = {
    app = var.site
  }
}
Next, you can run the stack in the following way:
terraform init
terraform plan
terraform apply
export BACKEND_ID=$(terraform output -raw backend_id)
export BACKEND_REGION=$(terraform output -raw backend_region)
After applying the stack, we store the bucket name for starting the backend of each subsequent stack (skip this for the stacks if you are not interested).
Deploying the artifacts stack in Terraform
The artifacts stack (terraform/resources--artifacts folder) handles creating the storage where Cloud Run will pull images. It is necessary because Cloud Run can only pull images from certain places, and one is the Artifact Registry.
The principal resource it creates is an Artifact Registry repository with a policy to keep only the latest images to prevent an accumulation of images, driving up storage costs.
# This is where we'll store the Docker images.
resource "google_artifact_registry_repository" "default" {
  location      = var.gcp_region
  project       = var.gcp_project_id
  repository_id = "${replace(var.site, ".", "-")}--repository"
  description   = "Artifact repository for ${var.site}."
  format        = "DOCKER"

  # This will ensure that we keep only a couple of images.
  cleanup_policies {
    id     = "keep-minimum-versions"
    action = "KEEP"
    most_recent_versions {
      keep_count = 3
    }
  }
  depends_on = [module.apis]
}
Then, we can apply the stack in the following way:
terraform init \
    -backend-config="bucket=$BACKEND_ID" \
    -backend-config="region=$BACKEND_REGION"
terraform plan
terraform apply
export REGISTRY_LOCATION=$(terraform output -raw registry_location)
export REGISTRY_NAME=$(terraform output -raw registry_name)
export PROJECT_ID=$(terraform output -raw gcp_project_id)
Note that the policy keeps the latest versions, even if they have errors, so bear in mind that when defining your policy.
After creating the artifact registry, you should build an initial version of the Docker image. It is necessary because Cloud Run requires you to have an image when you create the initial version of the service. You can find more information about building and pushing images to the Artifact Registry here.
SSR_IMAGE="ssr-site"
export IMAGE_URI="$REGISTRY_LOCATION-docker.pkg.dev/$PROJECT_ID/$REGISTRY_NAME/$SSR_IMAGE"
export REGISTRY_URI="$REGISTRY_LOCATION-docker.pkg.dev"
gcloud auth configure-docker $REGISTRY_LOCATION-docker.pkg.dev
(cd .. && docker build --platform linux/amd64 -t $IMAGE_URI . && docker push $IMAGE_URI)
If you have issues building the Docker image, removing node_modules and package-lock.json and re-running npm i works.
Deploying the computing stack in Terraform
The computing stack (terraform/resources--server folder) creates all the computing, billing, CDN, and DNS resources across both cloud providers.
The principal computing resource is the Cloud Run instance, defined in the following way. Note that the max_instance_request_concurrency limits how many requests each instance can handle. Balance that against the CPU and memory limits you define.
resource "google_cloud_run_v2_service" "default" {
  # Location
  location = var.gcp_region
  project  = var.gcp_project_id

  # Description
  name        = "${local.safe_site}--service"
  description = "Cloud Run instance to serve the SSR site ${var.site}"

  # Traffic
  ingress = "INGRESS_TRAFFIC_ALL"
  traffic {
    type    = "TRAFFIC_TARGET_ALLOCATION_TYPE_LATEST"
    percent = 100
  }

  template {
    # Scaling limits to ensure we control this.
    max_instance_request_concurrency = var.max_request_concurrency
    scaling {
      min_instance_count = var.min_instances
      max_instance_count = var.max_instances
    }

    # Run this as the default compute.
    service_account = data.google_compute_default_service_account.default.email

    containers {
      image = var.image

      # Where the container listens for requests.
      ports {
        container_port = var.port
      }

      # How to find out if it is healthy.
      startup_probe {
        initial_delay_seconds = 30
        timeout_seconds       = 1
        period_seconds        = 3
        failure_threshold     = 1
        tcp_socket {
          port = var.port
        }
      }

      # Limits for the container to follow.
      resources {
        limits = {
          cpu    = "1"
          memory = "512Mi"
        }
        # Allow it to become idle and then removed.
        cpu_idle = true
      }
    }
  }
  depends_on = [module.apis]
}
You can execute the stack in the following way.
terraform init -backend-config="bucket=$BACKEND_ID" -backend-config="region=$BACKEND_REGION"
terraform plan -var="image=$IMAGE_URI"
terraform apply -var="image=$IMAGE_URI"
If this execution fails because of enabled APIs, wait a few seconds and retry.
Deploying the Workload Identity Federation stack in Terraform
The Workload Identity Federation (WIF) stack (terraform/resources--wif folder) defines the authentication resources to allow the repository to impersonate a Service Account to deploy new versions in a CI/CD environment.
The most important resources it is deploying are the following Workload Identity Federation components:
data "google_compute_default_service_account" "default" {
  project = var.gcp_project_id
}

# The service account that we are meant to impersonate.
resource "google_service_account" "default" {
  account_id   = "sa-gh-${local.safe_site}"
  display_name = "Service Account for GitHub for the site ${var.site}"
  project      = var.gcp_project_id
}

# All the roles for the given Service Account
resource "google_project_iam_member" "default" {
  project  = var.gcp_project_id
  for_each = toset(local.roles)
  role     = each.key
  member   = "serviceAccount:${google_service_account.default.email}"
}

resource "google_service_account_iam_member" "compute_access" {
  member             = "serviceAccount:${google_service_account.default.email}"
  service_account_id = data.google_compute_default_service_account.default.name
  role               = "roles/iam.serviceAccountUser"
}

# Pool for identity specific to the site.
resource "google_iam_workload_identity_pool" "default" {
  project                   = var.gcp_project_id
  workload_identity_pool_id = "gh-pool-${local.safe_site}"
  display_name              = "gh-pool-${local.safe_site}"
  description               = "Identity pool for ${var.site}"
  disabled                  = false
}

# Provider for GitHub.
resource "google_iam_workload_identity_pool_provider" "gh" {
  project                            = var.gcp_project_id
  workload_identity_pool_id          = google_iam_workload_identity_pool.default.workload_identity_pool_id
  workload_identity_pool_provider_id = "gh-prov-${local.safe_site}"
  display_name                       = "gh-prov-${local.safe_site}"
  description                        = "Identity provider for ${var.site}"
  disabled                           = false

  # Mapping attributes from the tokens.
  attribute_mapping = {
    "google.subject"       = "assertion.sub"
    "attribute.actor"      = "assertion.actor"
    "attribute.aud"        = "assertion.aud"
    "attribute.repository" = "assertion.repository"
  }

  # Issuer of the tokens.
  oidc {
    issuer_uri = "https://token.actions.githubusercontent.com"
  }
}

resource "google_service_account_iam_binding" "provider_gh" {
  service_account_id = google_service_account.default.name
  role               = "roles/iam.workloadIdentityUser"

  members = [
    "principalSet://iam.googleapis.com/${google_iam_workload_identity_pool.default.name}/attribute.repository/${var.repo}"
  ]
}
You can execute the stack using the following commands:
terraform init -backend-config="bucket=$BACKEND_ID" -backend-config="region=$BACKEND_REGION"
terraform plan
terraform apply
Note the outputs since you need them in your repository CI/CD pipeline.
Important Note: Even though deploying the resources in Google Cloud is free, the resources in Amazon Web Services depend on paid resources such as Route 53. Cloud Run already gives you a domain with HTTPS, but you can achieve the same result with other providers. All these commands can incur costs if not done without the proper knowledge. Don't execute anything you don't feel comfortable with.
How can you test it?
Once the infrastructure is working, you should go either to your custom domain (in my case, ssr.gonzalohirsch.com) or the Cloud Run domain. You should get the same result you had locally, but the server-bound variables are present.
Important Note: In CloudFront, it's possible that navigating to the root will redirect you to the index.html page. In that case, click the "Back Home" button from Nuxt to solve it.
How can you integrate a pipeline into it?
Ideally, you should build a pipeline around it to automate deployments to Cloud Run. You can easily do this within a GitHub Action. You need a Service Account with enough permissions to push images to the Artifact Registry and create new revisions in Cloud Run. You can use the Workload Identity Federation stack to provision these resources.
We use Workload Identity Federation to secure access by limiting access to only our repository, and we create all the resources in the Terraform stack dedicated to it. In this case, a Service Account will push images to the Artifact Registry and deploy new Cloud Run revisions.
The GitHub Actions workflow is combined with semantic release to ensure Docker images have the version tag. The complete workflow file is here:
# Info on the action
name: Automatic Release
run-name: ${{ github.actor }} is automatically releasing 🚀

on:
  # Run automatically on main pushes
  push:
    branches:
      - main
  # Or run on manual trigger
  workflow_dispatch:
    inputs:
      logLevel:
        description: 'Log level'
        required: true
        default: 'warning'

jobs:
  # As per https://github.com/semantic-release/semantic-release/blob/master/docs/recipes/ci-configurations/github-actions.md
  release:
    runs-on: ubuntu-latest
    outputs:
      NEXT_RELEASE_VERSION: ${{ steps.prep_output.outputs.NEXT_RELEASE_VERSION }}
    steps:
      - name: 'Generate token'
        id: generate_token
        uses: tibdex/github-app-token@v1
        with:
          app_id: ${{ secrets.BOT_APP_ID }}
          private_key: ${{ secrets.BOT_PRIVATE_KEY }}
      # Check out the code to be able to deploy
      - name: 'Checking out code'
        uses: actions/checkout@v3
        with:
          fetch-depth: 0
          token: ${{ steps.generate_token.outputs.token }}
      # Setting up Node, 18 is LTS
      - name: 'Setting up Node'
        uses: actions/setup-node@v3
        with:
          node-version: 18
      # Make sure all the dependencies are ok and installed
      - name: 'Installing dependencies'
        run: npm ci
      # Removed the signatures part since it fails in GHA but not locally.
      # - name: 'Verifying the signatures'
      #   run: npm audit signatures
      # Install semantic release
      # Running Semantic Release
      - name: 'Getting the next version via Semantic Release'
        run: npx semantic-release@21 --dry-run
        env:
          GITHUB_TOKEN: ${{ steps.generate_token.outputs.token }}
      - name: Nothing to release
        if: ${{ env.NEXT_RELEASE_VERSION == '' }}
        uses: actions/github-script@v6
        with:
          script: core.setFailed('Nothing to release')
      - name: 'Releasing via Semantic Release'
        if: ${{ env.NEXT_RELEASE_VERSION != '' }}
        run: npx semantic-release@21
        env:
          GITHUB_TOKEN: ${{ steps.generate_token.outputs.token }}
      - name: 'Add to output'
        id: 'prep_output'
        if: ${{ env.NEXT_RELEASE_VERSION != '' }}
        run: echo "NEXT_RELEASE_VERSION=${{ env.NEXT_RELEASE_VERSION }}" >> "$GITHUB_OUTPUT"

  deploy:
    runs-on: ubuntu-latest
    needs: release
    if: ${{ needs.release.outputs.NEXT_RELEASE_VERSION != '' }}

    # Add "id-token" with the intended permissions.
    permissions:
      contents: 'read'
      id-token: 'write'

    steps:
      - name: 'Check out code'
        uses: 'actions/checkout@v4'

      # Required by the Docker builx action.
      - name: 'Set up QEMU'
        uses: docker/setup-qemu-action@v3

      # Required by the Docker builx action.
      - name: 'Set up Docker Buildx'
        uses: docker/setup-buildx-action@v3

      - name: 'Authenticate to Google Cloud'
        id: 'auth'
        uses: 'google-github-actions/auth@v0.4.0'
        with:
          workload_identity_provider: ${{ secrets.WIF_PROVIDER_ID }}
          service_account: ${{ secrets.WIF_SA_EMAIL }}

      - name: 'Set up Cloud SDK'
        uses: 'google-github-actions/setup-gcloud@v2'

      - name: 'Configure auth to Docker'
        run: gcloud auth configure-docker ${{ secrets.REGISTRY_URI }}

      - name: 'Build and push'
        uses: docker/build-push-action@v5
        with:
          push: true
          tags: ${{ secrets.IMAGE_URI }}:latest,${{ secrets.IMAGE_URI }}:${{needs.release.outputs.NEXT_RELEASE_VERSION}}

      - name: 'Deploy new revision'
        run: |
          gcloud run deploy ${{ secrets.RUN_SERVICE }} --image ${{ secrets.IMAGE_URI }}:${{needs.release.outputs.NEXT_RELEASE_VERSION}} --region ${{ secrets.RUN_REGION }}
Note that the Workload Identity Federation stack is declared here:
#...

# Add "id-token" with the intended permissions.
permissions:
  contents: 'read'
  id-token: 'write'

#...

- name: 'Authenticate to Google Cloud'
  id: 'auth'
  uses: 'google-github-actions/auth@v0.4.0'
  with:
    workload_identity_provider: ${{ secrets.WIF_PROVIDER_ID }}
    service_account: ${{ secrets.WIF_SA_EMAIL }}

- name: 'Set up Cloud SDK'
  uses: 'google-github-actions/setup-gcloud@v2'

#...
The only step left is configuring the following secrets in GitHub Actions following this guide and using what I explain in my post about Semantic Release GitHub Actions.
IMAGE_URI = URI FOR THE DOCKER IMAGE ("$REGISTRY_LOCATION-docker.pkg.dev/$PROJECT_ID/$REGISTRY_NAME/$SSR_IMAGE")
REGISTRY_URI = URI FOR THE ARTIFACT REGISTRY ("$REGISTRY_LOCATION-docker.pkg.dev")
RUN_REGION = REGION FOR CLOUD RUN ("us-east1", "europe-west1", ...)
RUN_SERVICE = NAME FOR THE CLOUD RUN SERVICE
WIF_PROVIDER_ID = FULL NAME OF THE WIF IDENTITY PROVIDER ("projects/$PROJECT_ID/locations/global/workloadIdentityPools/$POOL_ID/providers/$PROVIDER_ID")
WIF_SA_EMAIL = EMAIL FOR THE SERVICE ACCOUNT ("sa-gh-$SITE_NAME@$GCP_PROJECT_ID.iam.gserviceaccount.com")
The GitHub Action will create a new release when you push a commit to the main branch. That release includes a new Docker image and a Cloud Run revision.
Moving forward, what should you do?
It is a barebones example of how to get an SSR website running in Cloud Run. There are still a couple of improvements that you could make:
- You can optimize the Docker image to ensure the startup time is faster.
- You can add better caching policies to cache relevant content and static assets.
- You can improve the Nuxt server to add more functionality.
I hope this complete SSR guide helps you on your journey of mastering Nuxt. Don't forget to check out my other guides (caching on Nuxt 3, Nuxt 3 dark mode in Tailwind CSS, Nuxt 3 free newsletter and Nuxt 3 blogs) on improving your Nuxt application and the new "Back to Basics" section for a quick summary of the takeaways.
Back to Basics
Expand each FAQ to finish comprehending the basics and cement your knowledge for future implementations.